Procurement teams often get the same feedback from end users: the sleeve feels smooth at first, then it starts to “catch.” Forearm glide becomes unpredictable—drag in one spot, skip in another—and aim consistency drops. When that happens, the root cause is often construction, not just “fabric feel.”
If you’re choosing SKUs by mousepad type first, use how to choose a gaming arm sleeve for glass vs cloth mousepads as the setup layer, then use this article to lock the construction spec.
What “consistent glide” means in a sourcing spec
For gaming arm sleeves, consistent glide means low variation in sliding feel when pressure, speed, and sweat/humidity change. In friction terms, you’re trying to keep kinetic friction variation small across real play conditions—not just making the sleeve “as slippery as possible.”
Tribology test methods like pin-on-disk are built around controlled sliding: set load and motion, then observe friction and wear during the slide. This is the same measurement logic behind frameworks such as ASTM G99 (pin-on-disk), even though gaming sleeves aren’t a one-standard category.
In desk setups, those variables shift constantly:
- Pressure changes (arm angle, posture, desk height)
- Speed changes (micro-adjust vs big swipe)
- Humidity/sweat changes (warm-up, long sessions)
A sample that feels stable when dry can drift once the contact zone wets out.
Why seams break glide: 3 mechanisms that show up in complaints
1) Raised or hard seam points create local high pressure
Thread buildup, seam allowance bulk, knots, or stacked intersections turn uniform contact into point/line contact. That concentrates pressure and makes friction more sensitive to small posture changes—exactly the “random braking” end users describe.
2) Texture discontinuity causes “catch”
Even a low seam can introduce a surface change: different stitch density, different thread texture, different absorbency. On fast surfaces, that abrupt transition feels like a speed bump.
3) Seam pucker makes contact vary with movement
Seam pucker (rippling along the seam line) changes local thickness and pressure distribution as the forearm rotates or flexes. The same sleeve can feel smooth in one angle and grabby in another—creating inconsistent glide across gestures.
Flatlock vs seamless: what changes on a mousepad
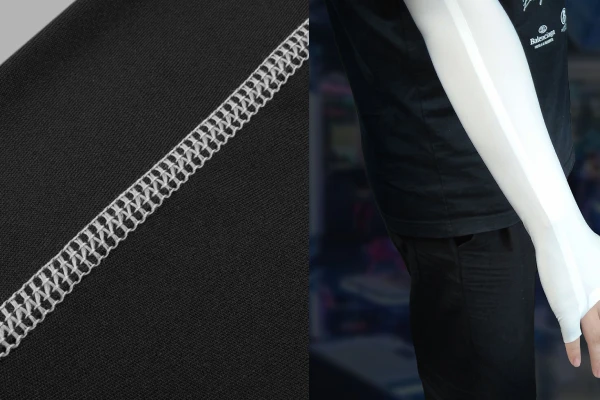
Flatlock (low-step seam) — best when you must join panels
Flatlock is designed to minimize bulk by joining fabric edges flatter than constructions that fold seam allowances underneath. For glide stability, that matters because it reduces the risk of a ridge acting as a friction “brake.”
What it means for your end users
- More likely to keep the contact band continuous with minimal step height
- Lower risk of a noticeable ridge than stacked seam constructions
- Still depends on seam placement and whether thread/loopers create roughness
When buyers typically choose it
- Complex patterns (thumb hole, pinky loop, shaped panels) that require seams
- Programs that need scalable sewing control and consistent reworkability
Seamless knitting — best when the underside contact band is truly seam-free
Seamless knitting can eliminate many stitched seams entirely. But “seamless” doesn’t automatically mean “no glide disruption.” Knit transitions, cuffs, logo zones, labels, and grip features can still create discontinuities.
What it means for your end users
- Highest potential for a seam-free underside contact band
- Fewer hard points from seam allowances
- Requires control of knit transitions and add-ons (labels, grippers, prints)
When buyers typically choose it
- Programs where the top requirement is “no seam on the underside contact zone”
- Designs that don’t require multiple forearm panels in the contact area
Most failures come from seam placement, not seam type
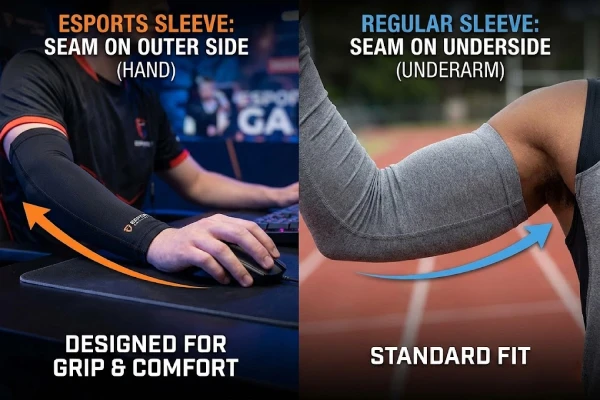
If a seam lands on the underside forearm band (the main desk/mousepad contact zone), end users will often feel it—especially after sweat and wear. The simplest sourcing rule that prevents many returns:
Keep the main underside contact band seam-free.
If a seam is unavoidable, move it to a lower-risk zone (outer forearm or upper arm) and use a low-profile construction.
This same logic explains why many players report inconsistency with a shirt sleeve: cuffs, wrinkles, and shifting seam positions create moving contact points. If your team needs a clean comparison to address that objection in listings or support scripts, use whether a long-sleeve can replace a gaming sleeve for FPS aim once.
Bonded / ultrasonic seams: “better” only if the edge is validated
Bonded or ultrasonic seams can be extremely flat because they reduce needle holes and thread bulk. For gaming sleeves, the tradeoff is real:
- Potentially the flattest seam profile
- Risk of a hard edge gradient (the bonded boundary becomes a new friction cliff)
- Durability depends on material system and wash/sweat exposure
So the sourcing answer is: treat bonded/ultrasonic as an option that must pass edge-feel and durability validation in the contact zone.
Decision table for procurement: which construction fits which priority
| Your priority | Best default construction | What to control in approval |
|---|---|---|
| No interruptions in underside glide | Seamless knitting | Knit zone transitions, cuff edge, prints/labels in contact band |
| Panel shaping (thumb hole, complex patterns) | Flatlock seams | Seam placement, thread roughness, no knots/backtacks in contact band |
| Lowest profile seam on paper | Bonded / ultrasonic | Edge hardness, sweat/wash durability, delamination risk |
| Lowest complaint rate at scale | Seamless (contact band) + flatlock elsewhere | Process controls, inspection standards, tolerances |
Durability is the real glide killer: why sleeves get “sticky” over time
Many programs pass “day-one feel,” then drift after real use:
- Surface fuzz increases
- Pilling appears in the contact zone
- Friction becomes higher and uneven
That’s why a sourcing spec should include pilling and abrasion language, not only “smooth feel.” A practical way to align material selection with durability outcomes is to reference arm sleeve materials (nylon vs spandex vs copper) explained and then map the chosen material system to contact-zone gates.
Common standardized language buyers recognize:
- ISO 12945-1 for pilling/fuzzing/matting tendency
- ISO 12947 (Martindale) for abrasion resistance
If the contact band fuzzes up quickly, glide will drift—regardless of how smooth it felt in sampling.
Seam reliability matters because it controls shape stability
Even a low-profile seam can become inconsistent if it stretches, slips, or distorts—because the contact band moves and puckers. Testing frameworks separate:
- Seam strength (will it fail)
- Seam slippage/opening (will it distort)
For woven materials, buyers often cite ASTM D1683 (sewn seam strength) and ISO 13936-1/-2 (seam slippage/opening). For stretch knits, the exact method selection depends on the fabric system, but the principle is consistent: shape stability controls glide stability.
A clean default spec that brands can scale
A buyer-friendly default for consistent glide is:
- Seamless underside contact band for consistency
- Flatlock for required panel seams outside the contact band
- Bonded/ultrasonic as an upgrade option only after edge-feel + durability validation
If you need this turned into an OEM-ready package (seam map, tolerances, inspection points, test gates), the fastest handoff is to align it with the OEM/ODM sports support manufacturing guide and then request custom arm sleeves with your construction requirements for sampling.
Consistent glide isn’t “fabric that’s slippery.” It’s continuous texture in the contact band, low-step seams, stable pressure distribution, and durability that prevents fuzz/pilling drift over time.
FAQs
Why does a gaming arm sleeve “catch” on a cloth mousepad?
Usually the sleeve’s weave or a seam ridge is snagging the pad texture. The problem gets worse when sweat increases tackiness. Try a smoother contact fabric, keep the underside contact band seam-free, and avoid printed or rough thread zones.
Is a seamless gaming sleeve always more consistent than flatlock?
Not always. Seamless removes panel seams, but knit transitions, cuffs, or gripper elements can still create friction changes. Flatlock can feel steadier when a seam is necessary—if it’s low-profile and placed away from the underside forearm contact zone.
Where should seams be placed for the most consistent glide?
Keep seams off the underside forearm band that slides on the desk or pad. Safer areas are the outer forearm or upper arm where contact pressure is lower. Also avoid seam intersections, backtacks, labels, or knots in any contact zone.
Why does glide feel different when moving up/down versus left/right?
Directional friction often comes from fabric grain, knit wale direction, or seam orientation relative to movement. A pad’s weave can also interact differently by direction. Test both sleeve sides, rotate the sleeve slightly, and choose constructions with uniform surface texture.
Does turning the sleeve inside out actually help?
Sometimes. Many sleeves have a smoother inner face than the outer face, so reversing can reduce catching on textured pads. If reversal helps, it’s a sign surface finish—not compression—is the main issue. Long term, spec a consistent texture on the contact side.
What seam type is most likely to cause irritation or pressure marks?
Bulky seam allowances and stacked stitches are common culprits, especially overlock/coverstitch in high-contact areas. These create raised points that concentrate pressure and can chafe when sweaty. Low-step flatlock or validated bonded seams are better for comfort-sensitive users.
How much sleeve coverage do players actually need—wrist only or with a thumb hole?
Most players only need coverage across the forearm contact zone. Extra hand coverage can help if the wrist edge rubs the pad, but it can also interfere with mouse grip. Choose thumb holes or pinky loops only if wrist shift is a real issue.
What’s the quickest at-home test to compare seam options before buying in bulk?
Use the same mousepad, posture, and humidity, then do repeated long swipes and micro-tracking for two minutes per sleeve. Note any “speed bumps” at specific angles. If catching appears, locate the seam or label and mark it as a contact-zone risk.